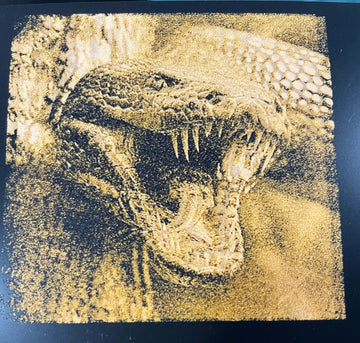
Lately, I got a problem which is when my laser scans the graphics in two-way will cause the edge of the scanned graphics, just like this image below.

The main reason cause this result is because after your machine has been used long enough, there may be uneven edges of the scanned graphic due to the relationship between the machine belt tensions. Therefore, a backlash needs to be added to correct this. Different speeds have different backlash. In general, the faster the speed, the greater the backlash.
After I realized this problem, I search a lot of information and tutorials from the internet, includes YouTube, and I finally figured it out.
Here is the thing I wanna to share with you guys.
Firstly, you need to open up your Lightburn, and find the Device Settings in Edit, press the ADD button, and adjust according to the speed you want, I usually choose 80,100,120,140,160mm/s to adjust. The Line Shift is the key, you need to compare it and tweak it to bring out a higher quality in your images.
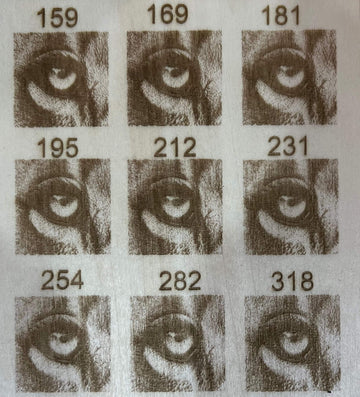
After you've adjusted these, you'll need to design a cube like this and change the ‘line’ to ‘fill’ in mode settings, and change the ‘Line Interval’ to ‘1.0000’, that is for you have a better view to see the output, and easy for alter the settings.


After that, you need to choose a line as the reference, if the result shows that the second line exceeds the first line, then we need to measure how many millimeters it exceeds and subtract the corresponding number of millimeters from the originally set value, and vice versa. Normally, we could reduce or increase by about 0.02mm.
Little Tips here: if you are not sure that you should add or reduce, you could set the value a little larger, which will give you a clearer visualization, like this picture below.

Normally speaking, you may take a lot of time to try and see, so be patient, and I'm sure you'll end up with a great result!
Hope this will help you, thank you!
Learn about Scratch Acrylic Materials: https://greatcarve.com/pages/scratch-acrylic
Learn about Scratch Leather Materials: https://greatcarve.com/pages/scratch-leather
GreatCarve Material Assessment: https://greatcarve.com/blogs/laser-engraving/greatcarve-material-assessment
Why you need a laser engraving Enclosure: https://greatcarve.com/blogs/laser-engraving/this-is-why-you-need-a-laser-engraving-enclosure
Scratch Acrylic - Unique fine engraving materials suggestion: https://greatcarve.com/blogs/laser-engraving/scratch-acrylic-unique-fine-engraving-materials-suggestion
How to make your engraving more desirable by using PhotoShop: https://greatcarve.com/blogs/laser-engraving/how-to-make-your-engraving-more-desirable-by-using-photoshop